
Adding color palettes to XCode
06/29/16 11:18 AM Filed in: Design | Development
I like to put together a color scheme for my apps in Sketch. It’s got a great ability to save the document colors in the color picker window, making it easy to refer to your palette as you design. However, I wanted an easy way to get those colors into XCode.
I’ve come up with a workaround for now. It works at the moment because I have a relatively limited set of colors I want to share, and I’m not planning on changing them too much at this point.
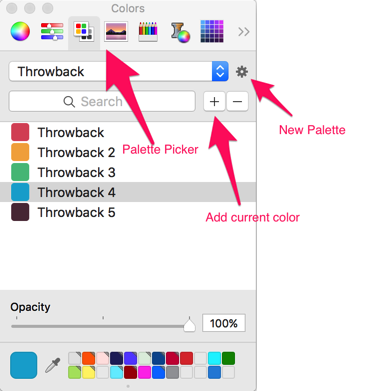
In the standard macOS color picker, you can choose the “Color Palettes” color picker (third from the left, at least on my computer). Most of the time this is set to “Apple” or “Web Safe Colors”. However, you can create your own palette using the gear button, rename it to something relevant, and then add your app’s colors to this palette. I found the easiest way to do this in Sketch is to use the “Show Colors” menu item under the “View” menu. This brings up the floating Apple Color picker. Load up with Sketch color picker, and every time you change the color in the Sketch picker, it will update the color in the Apple picker. You can then use the + button to add the current color, changing the name if you’d like. I did need to restart XCode to make it recognize the new palette, but now all of my app’s colors are in XCode, ready to be applied to UI elements in Interface Builder.
Simple trick, but handy.
I’ve come up with a workaround for now. It works at the moment because I have a relatively limited set of colors I want to share, and I’m not planning on changing them too much at this point.
In the standard macOS color picker, you can choose the “Color Palettes” color picker (third from the left, at least on my computer). Most of the time this is set to “Apple” or “Web Safe Colors”. However, you can create your own palette using the gear button, rename it to something relevant, and then add your app’s colors to this palette. I found the easiest way to do this in Sketch is to use the “Show Colors” menu item under the “View” menu. This brings up the floating Apple Color picker. Load up with Sketch color picker, and every time you change the color in the Sketch picker, it will update the color in the Apple picker. You can then use the + button to add the current color, changing the name if you’d like. I did need to restart XCode to make it recognize the new palette, but now all of my app’s colors are in XCode, ready to be applied to UI elements in Interface Builder.
Simple trick, but handy.
Pods in Playgrounds
06/28/16 12:28 PM Filed in: Development
I had a random thought while driving - wouldn’t it be fun to play with some new CocoaPods in Playgrounds? It occurred to me that this wasn’t something I had just stumbled across in my normal blog surfing. It turns out to be fairly easy, but the “obvious” answer from StackOverflow doesn’t work if you have updated to the 1.0 version of CocoaPods.
Check out this github project. You don’t even need to clone the repository, just look at the steps in the Readme:
• Create a new Xcode project
• Close Xcode
• Navigate to project directory
• pod init
• Update Podfile with Alamofire (see example)
• pod install
• Open .xcworkspace
• Add a new playground to the workspace
• Manage schemes -> Check 'Alamofire'
• Build the Alamofire scheme
• Xcode triggers a warning about updating the bundle settings for Alamofire; accept changes
• You should now be able to 'import Alamofire' in the playground
Replace Alamofire with your desired pod, and voila. The trick here seems to be building the scheme associated with the Pod. I tried to add two Pods, and didn’t have any luck - I suspect whatever Xcode is doing when it “fixes” your bundle settings is only valid for the first pod, not both. However, if you want to test out a single pod (Obj-C or Swift), this seems to be a fairly straightforward way of doing it.
I’m hoping this blog post servers as a reminder to myself as well as a help to anyone who is struggling with this in CocoaPods 1.0! I was using Xcode 7.3.1 and CocoaPods 1.0.1.
